
Blinds play a very important role in both functional and aesthetic ways. It helps control the amount of light entering your space, allowing you to create a comfortable atmosphere at any time of the day. They also provide privacy, blocking the view from outside while allowing you to open them when needed.
However, learning how to install blinds on the wall is crucial for ensuring they work effectively and last a long time. Correct installation prevents issues like blinds falling off, looking uneven, or not operating smoothly. It also helps you avoid damage to your walls and window frames, which might happen if the task is done without care. With the right tools and step-by-step guidance, the process can be simple and rewarding, making your home more functional and inviting.

With some guidance and careful planning, you can make the best decision. You will learn every step from measurement to installation, and in the end, you will install your blinds like a pro.
Let’s start!
Types of Mounting
When installing window blinds, there are two main types of mounting: inside mount and outside mount. These types are explained below:
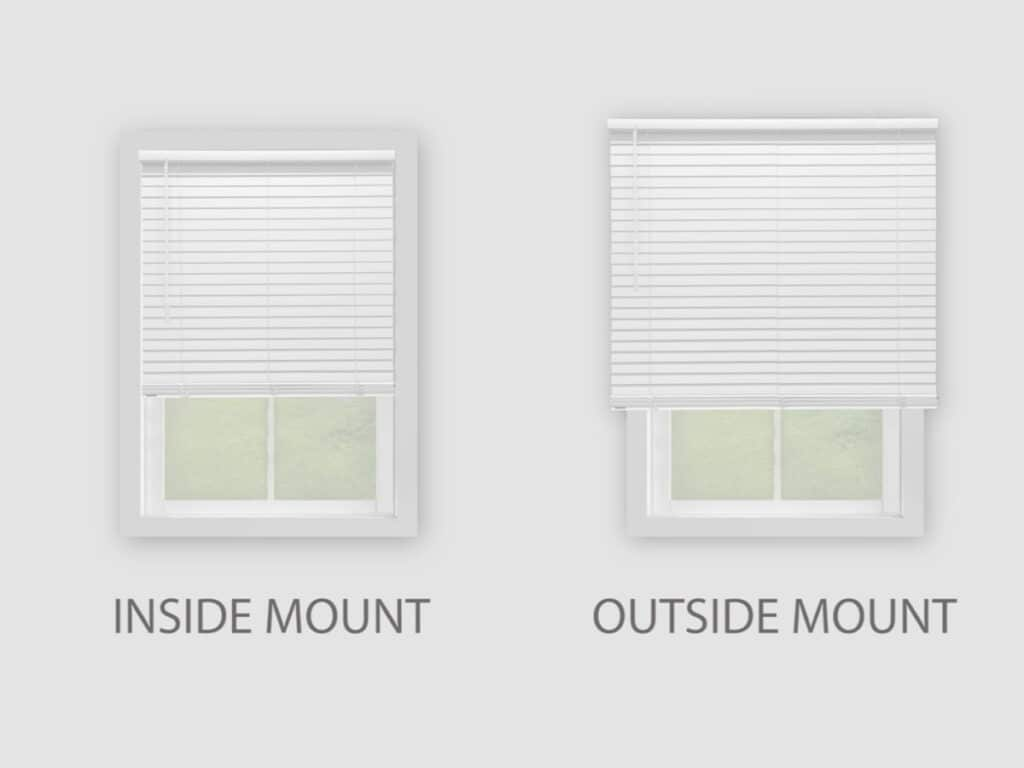
Inside Mounting:
Inside mounts or inside window frame installation uses brackets inside the window frame. It gives the window a very streamlined, clean look. These brackets can be placed on the upper corner of the window frame, inside the window frame, or anywhere else on the window frame.
Outside Mounting:
On the other hand, the outside mount means the blinds are installed on the wall above or around the window frame. This option is great for covering the entire window, blocking more light, and making the window appear larger. It is also useful for windows with shallow frames where inside mounting isn’t possible.
Wondering How to Choose the Right Blind for Walls?
Selecting the ideal blinds for your window is a challenging task. There are different types of blinds, such as vertical blinds, that go perfectly for patio doors and floor-to-ceiling windows. Roller blinds are operated by rolling the fabric up and down. In addition, pleated blinds give a very modern look, and honeycomb blinds provide excellent insulation to your room.
Now, each blind has its features, installation method, and benefits. You have to decide which one works best for your home or office. Thus, there is a great range of shapes, sizes, colors, and materials for the blinds. Here is everything you need to know to help you make a decision.
Tools and Materials Required for Installing Blinds
To avoid rushing when your installation operation starts, ensure everything is ready before you begin. Gather all the necessary parts mentioned below:
- A pencil to mark the drill points. Use an easy hand so the marks don’t get permanent.
- The measuring tape measures the height and width of your window and produces an accurate measurement to avoid gaps or overly tightened installation. Also, make sure that your blinds are cut properly according to the documented measurement of your window.
- A screwdriver to tighten the screw and secure the brackets to keep them in one place.
- The level can help you install the blinds perfectly straight. A small tilt will give an uneven look, so the level gives a professional look.
- Brackets- that are attached to the window frame or wall. They hold the blinds in position and support the weight of the blinds. It prevents them from falling or sagging.
- Drill machines to make holes in the walls for installing brackets. However, different types of drill bits can be used for different types of walls.
Step-by-Step Guide for Installing Window Blinds
Window blinds can be installed with the help of the following steps:
Step 1: Measure your Window
To ensure that the blinds fit precisely, use the measuring tape to measure the window frame’s height and width. When placing window mounts inside the window frame, measure the window’s narrow width to achieve a smoother appearance. When installing window mounts outside, add extra height and breadth to ensure full window coverage.
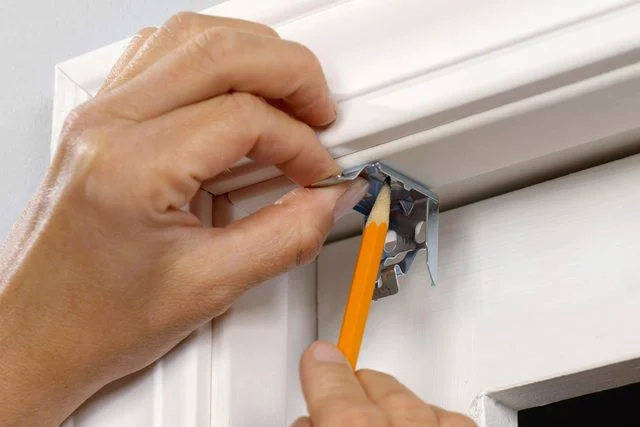
Step 2: Marking Brackets and Level Placement
The next step is to mark the brackets’ locations with a pencil after measuring the window frame’s height and width. Holding the brackets with the window frame, mark the precise location of the holes with a pencil. Use a spirit level to ensure that the brackets are in the same spot and to prevent misalignment. This is the most important stage because even a small misalignment can impact blinds’ appearance and functionality.
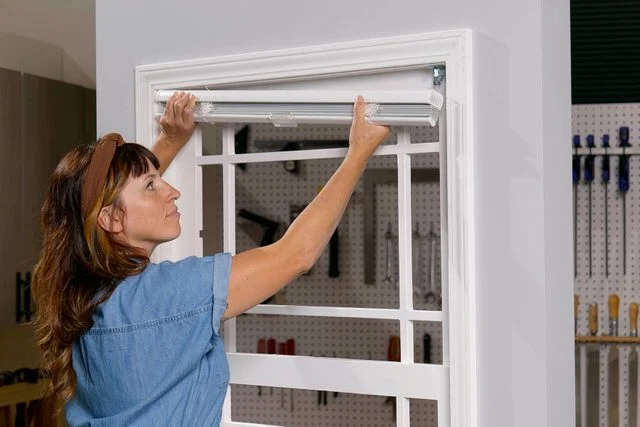
Step 3: Installing the Brackets and Hanging the Blinds
After marking the bracket placement, drill holes in the wall using a drill machine. Use the proper drill bit and drill a hole at the designated location because drills come with a variety of drill bits. Depending on the type of wall you have, use screws to install the brackets in the holes. Verify that the screws are securely fastened. Once the screws are firmly placed in their position, then hang the blinds. Different types of blinds have different types of headrails. Secure the headrail by tightening the screws of the brackets. Ensure the blinds are correctly seated, tightly attached, and will not fail.
Step 4: Testing the Blinds
Are the blinds operating flawlessly for you? This is the last step in testing the blinds to ensure they work properly. To check that your blinds are operating flawlessly and not jamming or sticking, gently raise and lower them. If you have any trouble raising or lowering the blinds, check the alignment and make the required corrections.
Step 5: Add Finishing Touches
Take a moment to finish the installation with these final steps. Use cord cleats to wrap and store dangling pull cords for safety, especially in homes with children or pets. Some modern blinds may come with cordless designs or wand systems for added safety. Also, remove any dust, debris, or packaging materials from the work area. Use a damp cloth to wipe down the blinds and window for a fresh, polished appearance.
Maintenance and Care for Blinds
Maintenance of the blinds is the main step after installing them. You can take care of your window blinds with the help of the following tips:
- Maintaining the functioning and aesthetic appeal of your blinds requires regular cleaning because dust can impair their performance.
- Roller blinds can be cleaned with any cloth to remove dust, or you can use a moderate detergent in the bathtub to give them a gentle wash. Check their rolling mechanism every so often.
- Since Venetian blinds feature a lot of horizontal slats, you need to wipe each one off with a towel to get rid of dust. Additionally, you can use a damp cloth and a light cleaning solution to remove any persistent stains, or you can soak them in the tub. To keep it working, replace any damaged slats.
- Vertical blinds are huge window blinds, so dust is easily collected. You can clean them with a vacuum brush or a moist towel. Lubricate the track if the blinds are having trouble sliding.
Enjoy your New Blinds
Installing blinds can improve the functioning and aesthetics of your house since they do more than just block out light; they also provide privacy and improve the look of your interior decor. The process is simple and includes measuring the window frame, assembling the necessary tools, mounting the brackets, hanging the blinds, and checking that everything operates as it should.
Ensure you have the appropriate tools for this task, such as a pencil, screwdriver, brackets, measuring tape, and—above all—the appropriate blind. Blind maintenance is just as important as blind installation. Frequent dusting, thorough cleaning, and alignment checks are necessary for long-term operation. So, learning how to install blinds on the wall is a valuable skill that can enhance your home style and make you proud of your work.
Stand back and admire your handiwork! You’ve just successfully installed the blinds.