Honeycomb blinds, also known as cellular shades, are a type of window covering made from soft, fabric-like materials. They are named “honeycomb” because their structure looks like the hexagonal cells of a beehive. These blinds are designed with small, air-trapping pockets that are layered between the fabric, giving them their unique shape and functionality.
The main purpose of honeycomb blinds is to improve energy efficiency in your home. The pockets in the blinds trap air, which helps regulate the temperature indoors. This means they can keep your home warmer in winter and cooler in summer, reducing the need for heating or air conditioning.
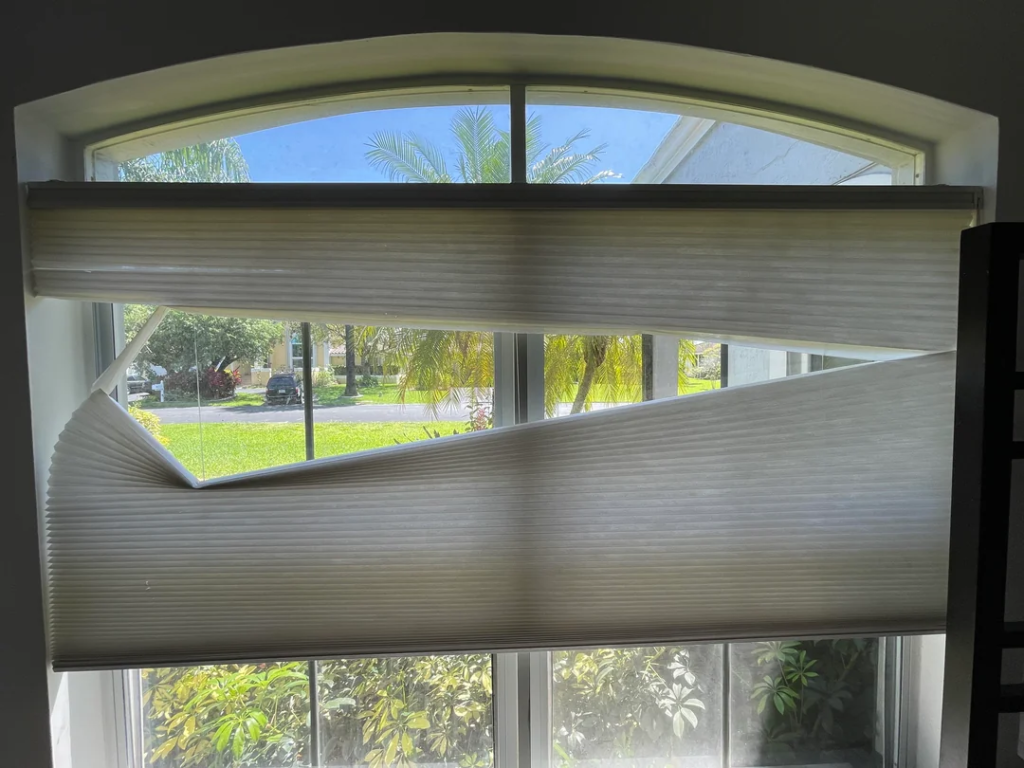
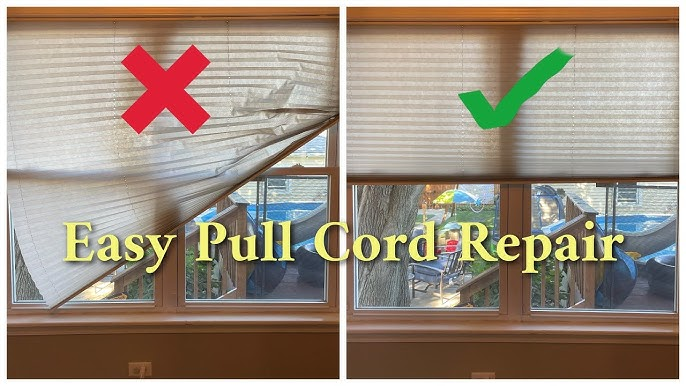
However, like any other blind or shade, honeycomb blinds can face issues with functionality over time. This can be frustrating for the people who think replacing the blinds can be a difficult task. But over time, these blinds can experience wear and tear, including issues like broken cords, damaged fabric, or malfunctioning brackets. When left unaddressed, these problems can make the blinds less effective at their primary purposes.
So if you are wondering how to fix broken string on honeycomb blinds, we are here to guide you each step. But first let’s go through the reasons why it happens!
Reasons for Broken Honeycomb String
Knowing what causes these problems can help stop them and make your blinds last longer. Here are some common reasons why honeycomb strings break:
Everyday Wear and Tear
Over time, the strings in honeycomb blinds can weaken due to regular use. Opening and closing the blinds daily puts stress on the strings, causing them to fray or snap after prolonged usage. This is a common issue in high-traffic areas like living rooms or kitchens.
Excessive Force
Pulling too hard on the cord or using excessive force when operating the blinds can lead to broken strings. It’s always best to use a gentle, steady hand when adjusting your blinds to avoid unnecessary damage.
Aging Materials
Like most products, honeycomb blinds are not immune to aging. The strings and other components can become brittle and lose their strength as the blinds grow older. Regular maintenance can help extend their life, but eventually, the materials will naturally wear out.
Improper Installation
Improper installation can put strain on the strings, leading to premature wear and breakage. If the blinds are not aligned correctly, the strings might rub against sharp edges or experience unusual tension, causing them to snap over time.

Tools and Materials Required
In order to fix a broken string on honeycomb blinds, you’ll need a few tools and materials. With the right tools and materials at your fingertips, you’ll be ready to tackle the job like a pro!
- Replacement String: You can grab it online or at specialty home improvement stores. Just make sure to pick a durable option that works with your blind model!
- Scissors: To cut the string to just the right length.
- Measuring Tape: To measure the new string accurately.
- Needle or Restringing Tool: Effortlessly guide the string through the honeycomb cells.
- Lighter or Clear Nail Polish: To keep the ends of the replacement string from fraying, just seal them up.
- Screwdriver or Pliers: Depending on the type of string you’re working with, you may need a tool to help pull it through.
- Ladder or Stepladder: To reach the top of the blinds if necessary.
Step-by-Step Guide to fixing the string
The broken string of honeycomb blinds can be fixed by following these steps:
Step 1- Remove the Blinds from the Window
First, take down the blinds from your window or wall (If Necessary). Check how they’re attached and find the screws or clips holding the brackets in place. Grab a screwdriver and gently loosen the brackets, holding the blinds securely so they don’t fall. Once they’re free, carefully remove the blinds and lay them on a clean, flat surface like a table or the floor, somewhere with enough space to work. Be gentle to avoid bending or damaging them, and make sure the area is clean to prevent scratches or stains.
Step 2- Inspect the Broken String
Find the broken string and take a good look at how it’s threaded through the blinds. Pay attention to the path it follows, this is super important to get the new string in the right way. Follow the string through the pulleys, loops, and slats, and double-check everything. To make it easier, snap a few photos from different angles or jot down some quick notes about the pattern. Trust me, taking a little extra time here will save you a ton of hassle when it’s time to replace the string!
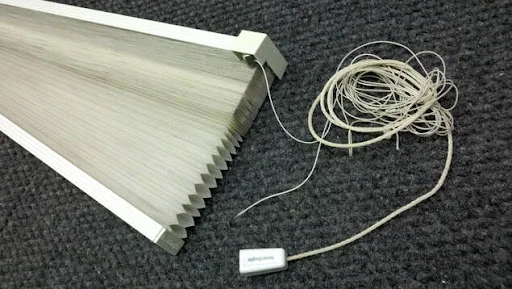
Step 3- Remove the Old String
First, find the damaged string on your blinds, look for where it’s torn or broken. Once you spot it, gently work it loose with your fingers or a pair of needle-nose pliers. The pliers can help you get through any tricky spots without putting too much pressure on the string or the blinds. Take your time with this step, no need to rush!
Going slow helps you avoid damaging other parts of the blinds or pulling too hard and causing more problems. If the string feels stuck, just loosen it bit by bit and check for any difficulty as you go.
Step 4- Cut and Prepare the New String
Measure the string that needs replacement to match the previous length with enough extra for safe measurement. The string cut should receive small tape treatment to prevent splitting. You can rely on this tip to provide ease of threading without creating a messy situation during a replacement job.
Step 5- Thread the New String through the Blinds
When threading the new string you should use a safety pin along with needle-nose pliers or simply your hands to push the string through each part of the solution. Give plenty of time to thread the string so it maintains the initial pattern. Adjust as you go if needed!
Step 6- Secure the String
At the last step secure the new string through a tight knot so it remains anchored at the bottom. The string tie should be tight enough to stop moving down yet loose enough to easily modify if necessary later. After tying the knot you should spend a minute to cut away any remaining string ends to achieve an organized appearance.
Test the new blinds by lightly operating them to verify that the movement is smooth and without looseness or unevenness. Monitor the blinds’ movement while operating them because adjustments through string tightening will make everything work smoothly.
Giving additional time in the installation process will lead to flawlessly operating blinds throughout their entire lifespan.
Step 7- Reattach the Blinds to the Window
Finally, place the blinds back onto the window brackets, making sure they’re lined up properly. Once they’re in place, grab your screwdriver and tighten the screws securely. Be sure to tighten them evenly so the blinds don’t vibrate or feel unstable.
When you’re done, give the blinds a quick test, pull them up and down to check if they move smoothly. If they’re a bit off or not working right, make any small adjustments needed until everything is just right.
Keeping your blinds in great shape is easier than you think. Just give them a regular clean with a soft cloth, a duster, or even a vacuum with a brush attachment. A little effort goes a long way to keep them looking good and working perfectly!
Give Your Blinds a Second Life
Fixing a broken string on honeycomb blinds can be difficult, but with the right tools and guidance, it’s a manageable task. By understanding the common causes of string damage, you can take steps to prevent future issues and keep your blinds in great shape.
Always handle your blinds with care and perform regular maintenance to extend their lifespan. If the repair feels too complex, don’t hesitate to reach out to a professional for help.