
Blinds are one of the easiest ways to upgrade a room. Window blinds transform your environment by creating the desired lighting conditions between your home office and living room spaces. But be careful while installing them, otherwise they can be a worse experience.
10 mistakes to avoid when installing blinds to ensure a perfect fit! Whether you’re buying roller shades, Venetian blinds, or child-safe cordless blinds, proper installation is the key. “In this article, we will discuss the ten principal mistakes that occur during blind installation and the necessary steps for smooth installations.
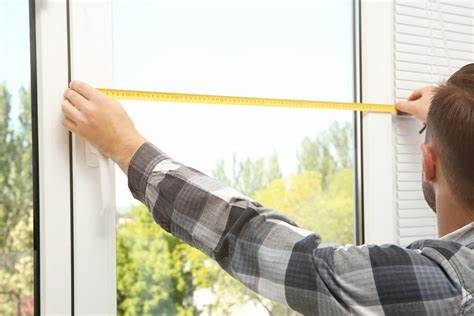
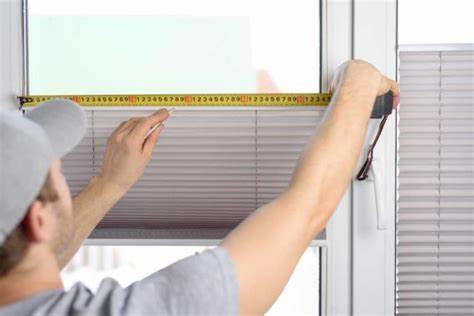
1. Measuring Incorrectly
When you want to install anything, the number verification process must be done at least three times to achieve 100% accuracy. One very common mistake while measuring a window for blind installation is “measurement Inaccuracy”. Improper measurement of windows leads to improperly fitting blinds that generate problems that include unwanted light transmission, an unsightly aspect, and operational limitations.
How to measure your windows correctly?
The only solution to avoid this problem is to double-check your measurement.
If you want to avoid this issue, you need to grab the necessary tools, such as a level, a writing pad, and a measuring tape, of course. The first step in measuring the process is, start by taking the height and the width of the window. Measure the dimensions three times each at the top, middle, and bottom of the width, along with three measurements at the left, middle, and right sides of the height. Note down precisely all the measurements, but for ordering the blinds, use the smallest height and width to guarantee a secure size.
2. Failing to Check for Window Obstructions
Numerous first-time installers tend to ignore adjacent window features when performing their work. After careful measurement and picking the ideal blinds, you are ready to perform their installation. But wait! Did you confirm that your window treatment plans do not face any obstacles toward success?
The minor items, such as window handles, locks, alarms, and window sill protrusions, prove difficult to install blinds effectively. Some of the common hazards are:
Not fully closed blinds: Your blind bottoms may not sit properly against the frame because a window handle creates gaps that allow light in and compromise privacy.
Broken blinds: The damage to your blinds becomes certain when you try to squeeze them tightly around obstructive objects. Blind destruction, together with warping and distortion, happens when one performs this action on the blinds.
Bumpy hanging: When one side of your blinds faces an obstruction, it causes them to become unbalanced, leading to an unprofessional appearance.
You must follow the given steps before starting the installation to prevent nasty problems.
Thorough check:
Research the window area to locate objects that could affect blind positioning or the installation project.
Clear the obstruction: Get rid of any removable obstacles temporarily. For permanent obstacles, you should check if different blind styles or mounting types exist that work with the obstruction.
Prepare Ahead: You should either select exterior frame-mountable blinds or limited-length blinds, which avoid the obstacle if you cannot remove it or adjust your window position.
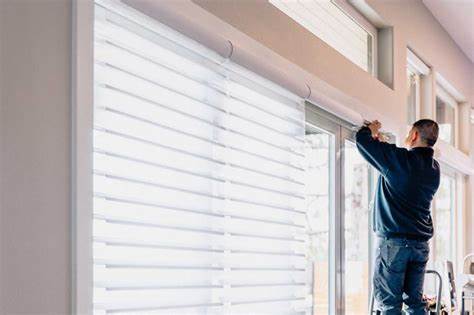
3. Not Accounting for Depth
The way you install blinds determines their functional and sleek appearance, so depth plays an essential role. The installation position of inside-mounted blinds becomes restricted by a window frame that is too shallow. Check the product specifications for the required depth. For example:
- Roller shades may need only 1–2 inches.
- Cellular or Venetian blinds might need 3–4 inches.
Choose an outside mount because this brings a better appearance and functionality in case your window frame has insufficient depth.
4. Neglecting to Level the Brackets
You might think your eyes are good at spotting a straight line, but trust us—your level is better. Crooked brackets are a top reason blinds hang unevenly or get stuck when raising or lowering.
Here’s what you need to do:
Use a spirit level (manual or digital) to mark where the brackets go. Then double-check alignment before drilling. Lastly, make sure both brackets are installed at the same height and distance from the window edge.
Taking additional time with the level at present will prevent future problems.
5. Using the Wrong Hardware
The blind installation depends on the proper selection of tools and hardware elements during the installation process. Regrettably, the tendency for DIY enthusiasts lies in using incorrect tools and/or lacking key equipment.
What you need to prevent this problem is to get your necessary tools ready.
Before starting blind installation, you need to prepare your tools and skills. A ladder, a screwdriver, a level, and a measuring tape are the final tools needed to complete the installation. You find yourself confused about operating any of these tools? Obtaining a tutorial from YouTube becomes our recommendation since inaccurate utilization might result in unsightly blind installation problems and loosened fixtures while jeopardizing your blinds and window frames. Then, read the manufacturer’s installation guides carefully since each blind variety comes with different directions.
6. Damaging the Blinds during Installation
Although blinds seem robust, they can be quite gentle. Damage to the blind happens easily, even before installation, by pulling cords harshly, bending slats, or mistreating the head rail.
To avoid this damage, you need to unpack blinds carefully and lay them on a clean, soft surface. Leave stuck parts until you confirm their correct installation as per the manual instructions. Use gentle, controlled pressure when snapping parts into place.
Easy install blinds are often designed to reduce damage risks, but it’s still important to handle everything with care.
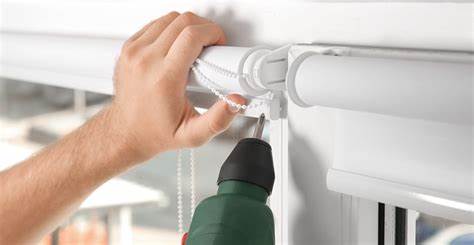
7. Failing to Properly Tension the Lift Cords
A check of your blind’s lifting performance will reveal improper tensioning of lift cords as the cause of sagging or dropping. Blinds can be operated with ease while maintaining their position because of appropriate tension. Most modern blinds come pre-tensioned, but minor adjustments might be needed after installation.
To adjust cord tension, use the provided tensioner (usually attached to the cord). Then pull gently to test movement. Adjust as needed until the blinds lift and lower evenly.
It may take a few tries, but getting this right makes a big difference in performance and longevity.
8. Neglecting to Secure the Tilt Mechanism
You can modify the amount of light entering the room using the tilt mechanism. The blind slats both need proper installation and a tight fitting, as improper alignment will block normal usage, or the mechanism can break.
To ensure it functions properly, you need to make sure that the tilt wand or cord is securely attached. Check for firm engagement between the gear and the slats. Moreover, if your blinds include a clutch system, ensure it is mounted according to the manual.
9. Overlooking Safety Features
Installation of blinds in homes with children or pets requires maximum safety measures. Dangling cords present a potential safety threat to users.
Why are cordless blinds considered safer?
Selecting cordless blinds is essential for safety because they are both installation-friendly and designed with safety at their core. Install cord cleats or tension devices for securing any loose cords.
10. Skipping the Final Test
You have properly installed the brackets along with tightening the headrail and stepped back to appreciate your work, but your work is still not complete.
A final blind operation test must be your standard practice before completing any work.
Pull the lift cord or raise the cordless blinds—do they move smoothly?
- Tilt the slats—do they open and close evenly?
- Are all brackets firmly holding the head rail in place?
Extra testing for a few minutes will help detect any functional issues and enable necessary adjustments while your tools are still out.
Taking the Time to Do It Right
Like many home improvement projects, installing blinds is one of those tasks where a little extra care up front saves a lot of trouble down the road. Making sure to follow these common mistakes will lead to beautiful blind functionality over many years.
The well-installed window blinds provide versatile decoration options for both home and office spaces and guest rooms, and conference rooms.
For hassle-free blinds designed for easy installation, explore the curated collection of Shenglian Window Decoration, and turn your home into a dream place.
FAQs
1. How can I correctly measure my windows for blind installation?
To measure your windows accurately for installing blinds, measure the width at three different points: the top, middle, and bottom. For the height, measure on the left, center, and right. Always use the smallest measurement size to ensure your blinds will fit perfectly, especially if you’re going for an inside mount. Double-check your measurements before purchasing to avoid mistakes.
2. What should I do if my blinds are uneven after installation?
An uneven appearance of blinds generally results from improperly set brackets or incorrect wall positioning. A level needs to be used to verify that mounting brackets maintain proper alignment during installation. If the problem persists, test all adjustment cords while inspecting for any blocking obstacles that may prevent proper blind placement. Check that all tilt mechanisms, along with lift cords, operate correctly.
3. How can I prevent damage to my blinds during installation?
You must handle your blinds gently during the entire installation period to avoid damage. Treat the slats with gentle care by not bending them excessively, and avoid strong pulling methods. Unpack these items gently on a clean surface that is also soft. Use appropriate tools and hardware components according to the installation guide to prevent blinds from breaking or losing alignment while securing the brackets.
4. What should I do if my blinds don’t fit my window?
First, verify your blinds’ measurements; if they do not fit your window opening, you are trying to use them on it. If they are too wide, you can trim the blinds (depending on the type) or opt for a custom-made solution. If your blinds prove to be insufficient for the window, then you must either return them to the seller or ask for a replacement with the right dimensions.
5. What tools do I need to install blinds?
You can install blinds successfully with a drill, level, measuring tape, and screwdriver. Before commencing the installation, always confirm if your blinds need additional tools or specific hardware by reading the manufacturer’s instructions.